

The march to digital gaming grows faster each day as gamers are ditching physical copies in lieu of digital versions.
This shift brings many benefits, but it also presents unique challenges. If you have a Nintendo Switch, you get either 32 or 64 gigabytes of internal memory for the standard and OLED versions, respectively, of the console.
Many are expanding their systems’ storage space via memory cards, but what happens when you fill up that storage? Fortunately, upgrading to a larger memory card is a simple process that can get you back to building your digital library in no time.
The first step to upgrading your memory is to find the right memory card.
Selecting the Right Fit for a Memory Card
While it might seem obvious to just go and buy a memory card for your Switch, there are a few considerations you need to take into account:
- The Nintendo Switch supports three types of memory cards: microSD (up to 2 GB), microSDHC (4-32 GB), and micro SDXC (32 GB and up).
- Your new memory card should have high speed capabilities including UHS-1 (Ultra High Speed Phase 1) compatibility. There is no benefit of going any higher than this phase due to hardware limitations on the Switch.
- Your new memory card should also have transfer speeds of 60-95 megabytes per second. The higher you go, the better gameplay experience you will have.
- There isn’t any benefit from going too much past 95 MB/S as the Switch has a transfer speed cap.
- A Class 10 (labelled C10 on the card) speed for a memory card will prevent lag or slow down on your Switch.
- If you opt to buy a memory card that is not Nintendo-licensed, be sure to review specs and compare them with the official cards.

- SanDisk is a popular brand and there’s often a question between buying the Ultra or Extreme cards. Extreme has faster transfer speeds, many of which extend past the Switch’s limitations, and are more expensive. Ultra provides slower speeds but is cheaper.
- Popular storage limits include 128 GB, 256 GB, 512 GB, and 1 Terabyte. Keep in mind many AAA games will be larger files while indie games and ports tend to have smaller file sizes.
- For those upgrading, consider having a micro SD to SD card adapter depending on your computer.
There are plenty of websites that can help you further decide which option is the best, including recommendations.

Replacing Your Old Memory Card for a New One
Once you’ve selected a new memory card, the next step is to transfer the data from your old card to your new one. Here’s how to do it:
- Power down your Nintendo Switch completely. Hold the power button for three seconds to bring up the menu. Select “Power Options” and then “Turn Off” to shut down the system completely.
- Remove your memory card.

- Insert your old memory card into your computer. You may need a micro SD to SD adapter to insert your card into your computer.
- Access the card’s content and copy it all onto your computer. Depending on the size of your card, this may take several hours.

- Format your new memory card. You can do this via the following steps:
- Insert your new memory card into your Switch.
- Select “System Settings” on the bottom of the home menu.
- Scroll to “System” on the left side and select it.
- Scroll to “Formatting Options” on the right side and select it.
- The following message will pop up “All data on the microSD will be deleted. Data cannot be restored once it’s deleted. Continue?” Select continue.
- Select “Format” for the console will restart and your new card will be formatted.
- Completely power down your Switch and remove your formatted card.
- Once the files from your old memory card are copied to your computer, remove the old memory card.
- Insert your new memory card into the computer.
- Copy your files onto your new memory card. This may take several hours depending on your file size.
- Once finished, remove the new memory card and insert it back into your Switch. Nintendo notes that any files that do not transfer properly can be redownloaded from the e-shop.
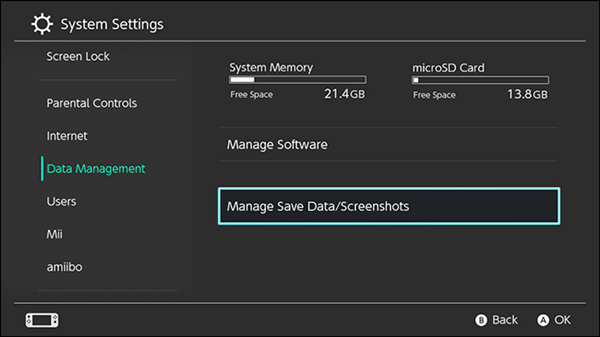
If you want to double check your files, go to “System Settings” on the home menu > “Data Management” > “Manage Software.” This will show you what files are on your system memory and what’s on the memory.
With that, you are ready to continue buoying your digital library and further enjoy your Nintendo Switch.
Nintendo Pow Block Podcast – Wednesdays at 7 a.m. ET

Nintendo Pow Block is Boss Rush Media and The Boss Rush Network’s Nintendo podcast. Each week, Edward, Corey, and their friends from around the internet come together to talk about the week in Nintendo, including news, rumors, new games, questions, and the fan-favorite Snacktendo segment. Check out Nintendo Pow Block Live on Twitch every Monday night at 8:30 p.m. Eastern / 5:30 p.m. Pacific or on Podcast Services and YouTube Wednesday mornings at 7 a.m. If you enjoy the show, consider leaving us a five star rating on iTunes and Spotify. Thanks for listening to Nintendo Pow Block!
Anchor | Apple Podcasts | Spotify | Google | Overcast | Pocket Casts
Sources: Nintendo
Featured Image: Nintendo Life


Leave a Reply